THE correct cylinder head assembly is one of the most important processes in engine repair. When performed improperly, it can result in leaks, loss of compression, overheating, and even engine failure. Therefore, following a complete checklist for cylinder head assembly is essential to ensure optimal engine operation and durability.
In this article, we will present a detailed step by step, with all the items that should be checked before, during, and after cylinder head assembly. Ideal content for professional mechanics, grinders, and enthusiasts looking to better understand the process.
What is the Cylinder Head?
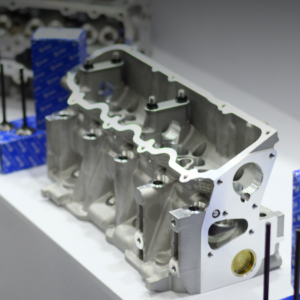
Before we get to the checklist, it's important to understand the role of the cylinder head. The cylinder head is the upper part of the engine where valves, camshafts, rocker arms, spark plugs, injectors, and other components are located. It's responsible for sealing the combustion chamber and for the intake of air and fuel, as well as the exhaust gas outlet.
Any error in assembling this part could compromise the entire operation of the engine.
Top Keywords for SEO
- cylinder head assembly checklist
- correct cylinder head assembly
- cylinder head torque
- cylinder head tightening sequence
- head gasket
- cylinder head grinding
- cylinder head tightening
- common mistakes in cylinder head assembly
- tools for assembling the cylinder head
Checklist for Correct Cylinder Head Assembly
1. Verification and Preparation of Parts
Before assembly, all parts involved must be cleaned, inspected and measuredThis includes:
- Head: must be flat, without cracks or corrosion.
- Engine block: check flatness and absence of residues.
- Cylinder head gasket: always new and compatible with the model.
- Cylinder head bolts: check whether they are reusable or whether they need to be replaced.
- Valve control, tappets and rocker arms: inspect for wear.
🔧 Tip: Cleaning must be done with suitable solvents and in a contamination-free environment.
2. Choosing the Right Cylinder Head Gasket
The head gasket must be of the correct model and adequate quality, compatible with the engine. Using the wrong gaskets can cause oil, water or compression leaks.
Furthermore, it is essential:
- Check the ideal thickness of the joint, especially after grinding.
- Check whether the joint is metallic or composite, as per the original design.
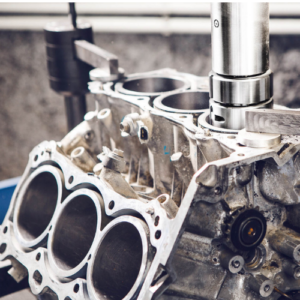
3. Checking the Flatness of the Cylinder Head and Block
Use a precision ruler and feeler gauge to check for warpage in the cylinder head or block.
Typical tolerance limits:
- Iron head: up to 0.05 mm.
- Aluminum head: up to 0.10 mm.
If the warping is outside the standard, grinding is required before assembly.
4. Cylinder Head Bolt Inspection
You head bolts are essential to ensure proper sealing. Old screws may have suffered stretching or fatigue and should not be reused unless the manufacturer allows it and they are within specifications.
Check:
- Stretching with caliper.
- Worn threads.
- Need to apply oil or grease to the threads (check the manual).
5. Cleaning Threads and Surfaces
Dirt on the threads or mating surfaces can compromise assembly. Use a wire brush, compressed air, and solvents to:
- Clean the screw holes.
- Remove any remaining old gasket.
- Remove oil, grease or rust from sealing surfaces.
6. Correct Head Gasket Positioning
With the surface clean and dry, position the head gasket paying attention to the correct orientation. Some joints are marked "TOP" or "UP" to facilitate positioning.
Common mistake: installing the gasket backwards, which blocks water or oil passages.
7. Installing the Cylinder Head on the Block
With the gasket in place, carefully position the cylinder head on the block. Avoid knocking or misalignment.
Tips:
- The help of guides (centering pins) facilitates precise fitting.
- Never drag the cylinder head over the gasket—this could damage it.
8. Screw Tightening Sequence and Torque
The torque of the screws must follow strictly the sequence and values defined by the manufacturer.
Typically, the tightening sequence proceeds from the center to the ends in a spiral pattern. Example sequence for a 4-cylinder engine:
CopyEdit8 4 1 5 9
7 3 2 6 10
Tightening in stages:
- First tightening: initial torque (e.g. 20 Nm)
- Second tightening: intermediate torque (e.g. +90°)
- Third tightening: final torque (e.g. +90° additional)
Attention: Use a calibrated torque wrench and, in the case of angular torque, use a goniometer or digital torque wrench with this function.
9. Assembly of Upper Components
With the head torqued correctly, proceed with assembling the upper components:
- Valve control
- Tappets
- Rockers
- Axes
- Pulleys
Check clearances, torque and lubrication.
10. Engine Timing
Perform engine synchronization based on the reference brands on the crankshaft and camshaft. Incorrect timing can cause:
- Startup failure
- Loss of power
- Valve knocking
Use specific shim tools if the engine requires it.
11. Installation of Manifold, Spark Plugs and Other Items
Assemble the intake and exhaust manifolds, spark plugs, sensors, hoses, and connections. Always check:
- Screw torque
- Joint integrity
- Correct connection of the harnesses
12. Final Check Before Departure
Before starting the engine, check:
- Oil level and circulation.
- Cooling system with clean water or additive.
- Timing/service belt correctly installed.
- No visible leaks.
13. First Start and Break-in
In the first match:
- Let the engine run for a few minutes at idle.
- Observe temperature, oil pressure and possible noises.
- Retighten manifolds and other connections if necessary.
14. Cylinder Head Retightening: Is It Necessary?
Some engines require cylinder head retorque after a specific number of operating hours or kilometers. Check your technical manual.
⚠️ Modern engines with “torque + angle” type screws generally do not require retightening.
15. Final Tests
Perform a road test and analyze:
- If there is loss of water or oil.
- Unusual smoke from the exhaust.
- Performance and general operation.
If everything is in order, the cylinder head assembly was a success!
Common Mistakes in Cylinder Head Assembly
- Reuse old gasket.
- Applying torque incorrectly or out of sequence.
- Install inverted gasket.
- Leaving dirt on the sealing surfaces.
- Forgetting to synchronize the engine.
Avoiding these errors is essential to ensure the durability of the service.
Tools Required for Correct Cylinder Head Assembly
- Calibrated torque wrench
- Goniometer (for angular torque)
- Precision ruler
- Feeler gauge
- Combination wrenches
- Socket set
- Engine technical manual
Final Considerations
Properly assembling a cylinder head involves more than just “screwing parts together.” It requires technical knowledge, attention to detail and use of appropriate toolsBy following this checklist, you drastically reduce the chances of error, increase engine efficiency, and avoid costly rework.
To ensure even greater quality, always choose new parts from reliable sources, especially gaskets, screws, and internal components.
Optimize Your Results
If you work with cylinder head assembly, whether in a workshop or a grinding shop, having a standardized process is a differentiator. Save this cylinder head assembly checklist and use it as a reference in all your services.
Want more tips like this? Follow our technical content and stay up-to-date on everything from engines to cylinder heads and professional assembly!